Preparing for the “PICTOGRAMS” test
We learned how to use icons to designate various objects and “pack” the big into the small in Pictograms (Part 1). Here we will consider the features of the method of testing figurative memory and preparing for it.
You can’t prepare for the PICTOGRAM test in a week. This requires hard work and Mom’s patience.
While preparing for the test:
- There will be a colossal development of imaginative thinking. Especially if you don’t give your child ready-made images, but think together: How can this be drawn?
- The child will learn to identify the characteristic features of objects, objects, and phenomena.
- will learn to draw many pictures and, in general, there will be a leap in the development of visual-motor coordination (VMC).
Therefore, I advise parents of all preschoolers to go through all these words at least once, even if you are not preparing for testing.
Test notes:
- The order on the piece of paper matters. It is good if the child places the drawings sequentially, leaving space between them. To organize his work, the child can use numbers to number the drawings.
- Letters and numbers are not allowed
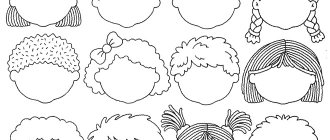
How to draw these “strange” words:
- To denote people of different genders, we used the notation of a triangle up and down, with a circle instead of a head.
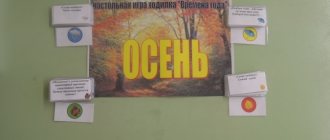
- Often there are phrases like “Warm rain” or “cold wind”. The kids and I agreed to use the “Sun” and “snowflake” icons to represent temperature.
- A separate problem is the transmission of emotions: sadness-sadness, happiness-joy-fun. If you use emoticons with a smile up and down, then the child begins to confuse this with happiness or joy. Therefore, it is probably better to develop your own system of emoticons or other icons for all emotions, and just learn it. Synonyms are not counted during testing. So if instead of SEPARATION, the child says SEPARATION, then he loses a point.
- To represent sound we used the sound waves icon (wi-fi icon)
- Arrows can be used to indicate the change in state from “was” to “became” and to indicate movement.
During your preparation, you, perhaps like me, will discover a lot of interesting things:
- The child begins to draw details and cannot stop. In this case, you need to stop it very gently and switch to the next word. This is a problem of inertia and poor attention span. You can try to train. There are special simulators.
- The child cannot draw. Can't draw a dog or a table right away.
- The child has little idea of what order is on a piece of paper. This may indirectly indicate an inability to organize the space around oneself and unpreparedness for school in general, because order in your notebook is the basis of studying at school.
Instructions for adults:
- The above words and phrases are slowly read aloud, and the children draw what comes to mind.
- Each drawing takes 0.5-1-2 minutes.
- At the same time, the adult carefully monitors that the child does not write letters, but draws.
- If the drawing turns out to be too large, you can remind that there is only one piece of paper, and all the drawings need to fit on it. This reminder is done once, approximately after the second or third word.
- If children begin to get carried away, draw out details and add something to the original drawing, then you need to remind them that it is not the quality of the picture that is important, but its connection with the word.
- If the child continues to draw, the next word is read to him.
- After finishing the work, the adult must number the drawings so that it is clear which drawing refers to which word.
- If your child can count, you can ask him to do it himself.
- An hour after the test, the children are presented with their pieces of paper with drawings and asked that, looking at their drawings, they remember the words that the adult dictated to them.
- The number of correctly reproduced words, as well as the number of errors, are counted and recorded in a journal.
- If instead of the word “parting” the child says “separation” this is considered a mistake.
Instructions for the child:
- I will now read the words that you need to remember well.
- There are a lot of words, and to make it easier for you to remember them, you can draw something on this piece of paper that will remind you of each of them.
- You can only draw pictures, not letters.
- Since there are quite a lot of words, but there is only one piece of paper, try to arrange the pictures so that they all fit on it.
- Try not to draw pictures. The quality of the drawing is not important, it is only important that they correctly convey the meaning of the words, so that you can remember them later.
Training scheme:
- For the first time we draw 10 words without a time limit. At first, you may have to think for a long time and show your child how to draw it on a separate piece of paper.
- Gradually, based on the child’s readiness, we begin to limit the time to 1 minute.
- After an hour and every other day, the drawings are presented to the child and he is asked to name the words. The results are recorded in a journal.
- The next day, at the beginning of class, you can look at the sheets with drawings from the previous days.
Features of the methodology
Pex cards were invented in the late 1980s by Dr. Andrew Bondy and his assistant.
They were working on a program to correct autism. The goal of the project was to encourage the child to spontaneously begin to communicate and interact. The methodology is based on the principle that the motive for communication must precede the onset of speech. The beginning of the program is to identify potential stimuli for the child, that is, what he likes and desires.
To master Pex, you will need basic skills:
- practice good eye contact, words, gesture symbols “yes”, “no”;
- stable learning skill;
- repeating the “do as I do” actions.
The baby needs to be taught to repeat a cycle of three actions when they are not spoken. Typically this system is intended for children under five years of age. Training is carried out in the form of exercises. Can be used both at home and in special institutions.
Physiognomy of facial expressions, smiles, gaze in pictures
In physiognomy, the corners of the lips pulled back in a smile and facial wrinkles near the eyes are joy
Surprise in physiognomy is wide open eyes, raised eyebrows, facial wrinkles on the forehead and an open mouth
Interest in physiognomy is when the eyebrows are slightly raised and the eyes are widened
Disgust is a facial expression that in physiognomy is expressed by pouting lips, furrowed eyebrows, and a wrinkled nose.
According to physiognomy, sadness and grief can be recognized by the downturned corners of the lips and dull gaze
In physiognomy, contempt is a raised eyebrow and head, as if a person is looking down at his opponent
In physiognomy, fear is an open mouth, raised eyebrows and wide open eyes.
In physiognomy, anger is knitted eyebrows, widening of the wings of the nose, and often exposure of teeth
Shame in physiognomy is a lowered gaze and often a lowered head, redness of the face
In physiognomy, a relaxed smile, in which teeth and not gums are visible, speaks of harmony of feelings
In physiognomy, a smile with exposed gums is a signal that a person does not believe that they can love him just like that
In physiognomy, a smile with the upper lip stretched over the teeth is a signal of insincerity, a desire to hide feelings
In physiognomy, a crooked smile is considered a smile for show, appearing more out of necessity.
In physiognomy, a smile with lips closed as if for a kiss speaks of a person’s desire to keep a distance
Physiognomists call an unrestrained smile one in which both rows of teeth are exposed and facial wrinkles appear.
Physiognomists call slightly stretched lips, which are not tense, a dreamy smile.
The look from below speaks in physiognomy of respect for the interlocutor
A top-down look at physiognomy - disdain, criticism of the opponent
Looking to the side according to physiognomy - impatience
A narrowed gaze in physiognomy means bad intentions
A glance from under the brows according to physiognomy is a sign of submission
A piercing direct gaze in physiognomy is a sign of self-confidence
Method of working with Pex
For the first exercises, it is best to use images of something loved and dear. It could be an expensive toy, food, hobby, cartoons, or a fairy-tale character. This picture should make the child want to get something that is not always available.
Training stages:
- First, the child must be taught to pick up a picture.
- In the second step, the baby is taught to give the card.
- The third stage involves teaching the child to begin to recognize the objects that are drawn on the plates. Errors that occur at this step lie in the inability to identify the image.
- Then the child needs to be explained how to form sentences like “I want a toy (or something else)”, “Give me...”.
- At the fifth step, the baby is taught to answer the questions “What do you want?”, “What do you see?”
- The final stage involves teaching the child to distinguish objects on the plates, name them independently and answer when asked.
How to make PECS cards yourself
PECS cards are very easy to make yourself. It is best to use photographs, because... The image is more realistic and is better perceived by the child.
You can also print pictures found on the Internet on a color printer. It is easy to make pictures of the required size by saving them in a pre-created table in Microsoft Word.
After printing, it is better to laminate or seal the cards with tape. On the back side, glue Velcro with adhesive backing, which are sold in a sewing store.
Article on the topic: Game sets for children with autism
Windows XP windows
Any document or program in Windows XP uses a rectangular area of the screen called a window . Windows can be maximized, minimized, restored and closed. To do this, use the corresponding buttons, which are located in the upper right corner of the window (Figure 1). Figure 1 - Standardized Windows XP window The maximize/restore button (the middle of the three buttons) allows you to maximize the selected window to fill the entire monitor screen or, conversely, restore the window to its original size if it is already maximized to fill the entire screen. You can resize a window that is not maximized if you place the mouse pointer on one of the edges of the window (it will take the form of a double-sided arrow), press the left mouse button and, without releasing it, move the mouse in any direction. The minimize button (the left button with the "_" icon) turns the selected window into a rectangular icon and places it in the task bar (the highlighted line is usually at the bottom of the screen). To restore a minimized window, left-click on its icon. Closing a window means removing its image from the monitor screen and making the objects located in it temporarily inaccessible. This can be done by left-clicking on the close window button (right button with an “x” icon). To make it easier to work with the window, scroll bars are provided. They appear if there is an object in the window whose display dimensions are larger than the window dimensions. The scroll bar is used to scroll through the object within the window. To scroll in the vertical direction, use the scroll bar, which is located on the right side of the window, and in the horizontal direction, use the scroll bar at the bottom of the window. The scroll bar has a square or rectangular slider and a scroll arrow. Using the slider, you can quickly scroll through objects inside the window. The scroll bar arrows allow you to more precisely move an object in the window.
Questions and answers
What sizes should you make cards at home?
It’s better to take a size of 4*4 or 5*5; you shouldn’t cut out large pictures.
What images should you start learning with?
It is best to print out what the child loves, what is meaningful and interesting to him. Or start with simple pictures - fruits, toys.
What paper should you use when creating pictures?
It is better to take something denser and thicker so that it is easier for the baby to hold. In addition, be sure to laminate it so that the pictures do not deteriorate for a long time.
How often should classes be held?
One lesson lasts for half an hour. There is no clear plan for how many times a week to exercise. It all depends on the individual characteristics of the child, on his learning skills.
What are Social Stories for Autism in Pictures?
This is part of a visual program that promotes the autistic person's interaction with the world and people around him.
These are short stories shown in pictures. They describe different situations, people's reactions, desired actions that the child should take.
Example of a social story “heating up food”:
Ending a Windows XP session
"Turn off computer". Sets the method for terminating a computer session:
- enter standby mode, i.e. low power consumption mode (in combination with the “Ctrl” key - sleep mode, turning off the computer while remembering the current state of running applications);
- shut down and turn off the computer;
- restart the computer (as if to turn off - turn on the computer without actually disconnecting it from the power supply) and continue working with Windows XP.
Recycle Bin The Recycle Bin is a folder on your desktop. Its peculiarity is that any deleted objects are first placed in the trash bin and stored there for some time before final destruction. Using the drag-and-drop method, you can delete any system object (place it in the trash can). In order to restore a recently deleted object, just open the “Trash” using the menu or context menu (it appears if you place the mouse pointer on the “Trash” icon and right-click), select the desired icon in the window that opens and move it from the folder "Trash" to any other folder or to the desktop.
What results can be achieved
Using Pex allows you to achieve the following results:
- This program will help you quickly develop communication skills in a short time.
- The method promotes the child’s development of initiative, its expression, and spontaneous pronunciation of words and phrases.
- Communication and contact with people around you will become more accessible. Subsequently, the baby can be helped to generalize the acquired verbal means of communication.
- The use of Pecs cards does not interfere with spoken language, but, on the contrary, accelerates its emergence and development. This is achieved by parrying verbal and visual stimuli in an exchange process.
No significant disadvantages were noticed; the effectiveness of the system was confirmed by the National Center for Professional Development.
Autistic people are not lazy to speak; they want to communicate with family and friends, but do not know how to do this. Therefore, an alternative program to help develop speech is available to many parents and their children.