Consultation with a speech therapist “How to stretch the hyoid frenulum?”
Natalia Khryakova
Consultation with a speech therapist “How to stretch the hyoid frenulum?”
The hyoid frenulum is a membrane that connects the tissues of the floor of the mouth and the tongue.
A short hyoid frenulum is located too close to the tip of the tongue and limits upward movement of the tongue.
Description and rules for performing exercises for the hyoid frenulum .
Exercises to stretch the hyoid frenulum are performed as often as possible, up to 5-7 times a day for 10-15 minutes. Be sure to check that the exercises are performed correctly in front of a mirror.
According to the recommendations, the basic rules for conducting articulation exercises include:
• slowness, lack of haste and maximum impact;
• good mood, smile and wide open mouth;
• it is necessary to alternate between exercise and rest, because such activities are serious physical activity.
Attention! If the child has undergone surgery to trim the hyoid ligament , then the given exercises must be performed for stretching and development, since it happens that the frenulum grows together and the situation becomes worse than it was before the operation. The child also needs to be seen by an orthodontist or dentist. It must be remembered that exercises can only be performed under the supervision of a speech therapist .
A set of exercises for stretching the hyoid ligament ( " frenulum "
).
"Chicks"
The mouth is wide open, the tongue lies quietly in the oral cavity.
"Spatula"
The mouth is open, a wide, relaxed tongue rests on the lower lip.
"Needle"
Open your mouth. Stick your tongue far forward, tense it, make it narrow. Hold in this position for up to 15 seconds.
"Tube"
The mouth is open, the lateral edges of the tongue are curved upward.
"Watch"
The mouth is open. Lips are stretched in a smile . The tip of the narrow tongue alternately stretches at the teacher’s count to the corners of the lips.
"Swing"
1. Smile, open your mouth. On the count of "one-two"
alternately rest your tongue on the upper and lower teeth. The lower jaw is motionless.
2. Smile, open your mouth, reach with the tip of your tongue first to your nose, and then to your chin, then again to your nose, and then again to your chin.
"Football"
Close your mouth, press the tip of your tongue with tension into one or the other cheek.
"Delicious jam"
The lips are stretched into a wide smile , so that all the teeth are visible. The lower jaw is lowered, the distance between the teeth is 1-1.5 fingers. The tongue lies quietly in the oral cavity.
Without changing the position of the lips and lower jaw, stick out the wide tongue forward, bend its wide tip upward, covering the upper lip with it. Then we remove the tongue into the oral cavity, as if licking the upper lip from top to bottom. A child can, in fact, smear jam or honey on his upper lip.
Attention! The tongue moves strictly in the up-down direction. The lips and lower jaw should be motionless during the exercise.
"Painter"
The lips are stretched into a wide smile , so that all the teeth are visible. The lower jaw is lowered, the distance between the teeth is 1-1.5 fingers. The wide tip of the tongue rests against the base of the upper incisors, the lateral edges of the tongue are pressed against the base of the molars.
The wide tip of the tongue moves as far as possible into the depths of the mouth, without leaving the upper palate, as if stroking it, and returns back in the same way.
Attention! Make sure that the lower jaw is motionless and does not move forward.
“Brushing the upper teeth”
Smile so that both the upper and lower teeth are visible; Open your mouth wider. The chin is motionless! Use the tip of your tongue to vigorously rub the tubercles behind your upper teeth from side to side from the inside.
"Drum"
The lips are stretched into a wide smile , so that all the teeth are visible. The lower jaw is lowered, the distance between the teeth is 1.5 fingers. The wide tip of the tongue rests on the base of the upper incisors.
We pronounce sounds: “d-d-d”
at a fast and slow pace.
Attention! Only the tip of the tongue works, the lower jaw and lips are motionless.
"Horse"
The lips are stretched in a wide smile , so that all the teeth are visible. The lower jaw is lowered, the distance between the teeth is 1.5 fingers. The wide tip of the tongue rests on the base of the upper incisors. The anterior part of the back of the tongue is tightly pressed to the upper alveoli. The lateral edges of the tongue are pressed against the base of the molars.
We forcefully tear the tongue away from the teeth and palate and lower it down. The exercise can be performed at a fast or slow pace.
Attention! The lower jaw continues to remain motionless.
"Fungus"
The lips are stretched into a wide smile , so that all the teeth are visible. The lower jaw is lowered, the distance between the teeth is 1-1.5 fingers. The wide tip of the tongue rests on the base of the upper incisors. The anterior part of the back of the tongue is tightly pressed to the upper alveoli. The lateral edges of the tongue are pressed against the base of the molars. In the gap between the upper and lower teeth, you can see the body of the tongue, resembling a mushroom cap, and a stretched hyoid ligament , reminiscent of its stem.
We hold this position for as long as possible, ideally up to 10 seconds.
Attention! The lower jaw remains strictly motionless.
"Harmonic"
The lips are stretched into a wide smile , so that all the teeth are visible. The lower jaw is lowered, the distance between the teeth is 1-1.5 fingers. The wide tip of the tongue rests on the base of the upper incisors. The anterior part of the back of the tongue is tightly pressed to the upper alveoli. The lateral edges of the tongue are pressed against the base of the molars.
Now we slowly lower the lower jaw until it is possible to hold the tongue in place, pressed to the palate. Feel how “ frenulum ”
?
Now we just as slowly return the lower jaw to its original position. The exercise is performed first at a slow, then at an increasingly faster pace. The hyoid ligament stretches and contracts like the bellows of an accordion.
Attention! During the exercise, the lower jaw falls straight down, without moving forward or moving to the side.
"Household"
exercises to
stretch the hyoid ligament :
1. Licking plates from shallow to deep.
2. Eat ice cream by licking it with your tongue.
3. Licking jam from a large tablespoon with your tongue (yogurt, honey, condensed milk, etc.)
4. Licking a large Chupa Chups
and so on.
Exercises to normalize breathing function
Exercise No. 1 Full breathing. Take a long breath through your nose. During inhalation, the abdomen “inflates”, then the chest expands. When you exhale (through the nose), on the contrary, the volume of the chest first decreases, then the stomach retracts.
Exercise No. 2 Chest breathing. Exhale. Take a long breath through your nose. At this time, the chest expands and the stomach retracts. When you exhale (through the nose), the stomach retracts.
Exercise No. 3 Abdominal breathing. Exhale. Take a long breath through your nose. At this time, the stomach protrudes. When you exhale (through the nose), the stomach retracts.
Exercise No. 4 The skill of full, extended exhalation. Walk at an average pace. Inhale and exhale only through the nose. Inhale for three steps, exhale for four steps. After three to four days, the duration of exhalation should be increased by one count (5,6, etc.)
Exercise No. 5 Inhale and exhale alternately through one nostril (press the second nostril tightly with your finger).
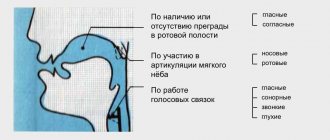
Features of sound production in children with a short frenulum
In the process of carrying out exercises and massage to stretch the hyoid frenulum, certain sounds are made:
- Sounds like [ch], [l], [sch], [d], [t] should be started when the frenulum has not yet fully stretched.
- The sounds [р], [ш], [ж] - these letters can be taught to children to pronounce after the frenulum is fully stretched. All other sounds are pronounced by the child without complications.
While performing all the exercises, remember that they need to be performed:
- regularly;
- with maximum efficiency;
- gradually increasing the time and amount of exercise.
As soon as you notice that your child’s pronunciation of sounds is incorrect or he cannot reach the palate with his tongue, you should immediately begin to perform the exercises described above. The sooner you start classes, the faster and easier it will be to achieve results. Stretching the frenulum is an unpleasant and even slightly painful procedure for the child. There is no need to expect great results after two or three days of training; you should be patient and gradually move towards your goal.
Exercises to normalize breathing function
Exercise No. 1 Full breathing. Take a long breath through your nose. During inhalation, the abdomen “inflates”, then the chest expands. When you exhale (through the nose), on the contrary, the volume of the chest first decreases, then the stomach retracts.
Exercise No. 2 Chest breathing. Exhale. Take a long breath through your nose. At this time, the chest expands and the stomach retracts. When you exhale (through the nose), the stomach retracts.
Exercise No. 3 Abdominal breathing. Exhale. Take a long breath through your nose. At this time, the stomach protrudes. When you exhale (through the nose), the stomach retracts.
Exercise No. 4 The skill of full, extended exhalation. Walk at an average pace. Inhale and exhale only through the nose. Inhale for three steps, exhale for four steps. After three to four days, the duration of exhalation should be increased by one count (5,6, etc.)
Exercise No. 5 Inhale and exhale alternately through one nostril (press the second nostril tightly with your finger).
Exercise No. 6 Exhale. Pinch your nose with your fingers. Slowly count out loud to 5, then take a deep breath and exhale through your nose.
Exercises to strengthen the pharyngeal muscles
Exercise No. 1 Alternately tilt your head back as much as possible, leaning forward.
Exercise No. 2 Throw your head back. In this position, alternately tilt your head towards the right and left shoulder.
Exercise No. 3 Throw your head back, in this position alternately turn your head, without releasing your chin, to the right, then to the left.
Exercises to normalize the function of lip closure
Exercise No. 1 Pull your lips forward, close them, draw a tube, and stretch them wide.
Exercise No. 2 Pull your lips forward, close them, depict a mouthpiece, a proboscis.
Exercise No. 3 Close your lips, puff out your cheeks, slowly squeeze the air through your clenched lips with your fists.
Exercise No. 4 Close your lips, then move them alternately to the right and left.
Exercise No. 5 Close your lips, blow air under your upper lip, then under your lower lip.
Exercise No. 6 Place bent little fingers in the corners of the mouth, do not close your lips, spread your fingers slightly to the sides, close your lips.
Exercise No. 7 Blow out a stream of air with force (“a breeze is blowing,” let’s put out the candle,” “let’s make a storm,” etc.).
Exercises to normalize breathing function
Exercise No. 1 Full breathing. Take a long breath through your nose. During inhalation, the abdomen “inflates”, then the chest expands. When you exhale (through the nose), on the contrary, the volume of the chest first decreases, then the stomach retracts.
Exercise No. 2 Chest breathing. Exhale. Take a long breath through your nose. At this time, the chest expands and the stomach retracts. When you exhale (through the nose), the stomach retracts.
Exercise No. 3 Abdominal breathing. Exhale. Take a long breath through your nose. At this time, the stomach protrudes. When you exhale (through the nose), the stomach retracts.
Exercise No. 4 The skill of full, extended exhalation. Walk at an average pace. Inhale and exhale only through the nose. Inhale for three steps, exhale for four steps. After three to four days, the duration of exhalation should be increased by one count (5,6, etc.)
Exercise No. 5 inhale and exhale alternately through one nostril (press the second nostril tightly with your finger).
Exercises to normalize breathing function
Exercise No. 1 Full breathing. Take a long breath through your nose. During inhalation, the abdomen “inflates”, then the chest expands. When you exhale (through the nose), on the contrary, the volume of the chest first decreases, then the stomach retracts.
Exercise No. 2 Chest breathing. Exhale. Take a long breath through your nose. At this time, the chest expands and the stomach retracts. When you exhale (through the nose), the stomach retracts.
Exercise No. 3 Abdominal breathing. Exhale. Take a long breath through your nose. At this time, the stomach protrudes. When you exhale (through the nose), the stomach retracts.
Exercise No. 4 The skill of full, extended exhalation. Walk at an average pace. Inhale and exhale only through the nose. Inhale for three steps, exhale for four steps. After three to four days, the duration of exhalation should be increased by one count (5,6, etc.)
Exercise No. 5 Inhale and exhale alternately through one nostril (press the second nostril tightly with your finger).