“Logokub” is a non-traditional speech therapy textbook for language development
Evgeniya Zamiskikh
Logokub - a non-traditional speech therapy textbook for language development
Trainer with first qualification category
"Logocube"
—
non-traditional speech therapy textbook for the development of language.
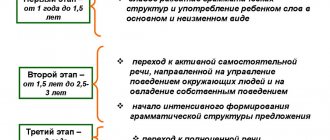
Today, the problem of language is even relevant in preschool . With skin failure, the number of children who are at risk of damage increases. These children often suffer from low cognitive activity, their memory, mental thinking, and respect suffer. Therefore, the most important mental thoroughness of the preschool children’s activities is the creation of a pleasant situation that encourages the guilty brother to take an active part in the household activity. In this case, the game process is important. Gra is the main type of activity for children. To stimulate the interest of children, it is time to select and modify gaming techniques and methods in your robot.
Pos_bnik "Logokub"
actively vikoristuyu for taking care of children from 2 to 7 years.
“Logocube”
is indispensable for any activity.
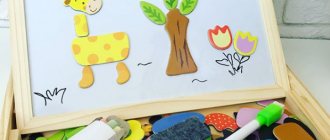
And the children really love to play with him. The basket is formed into a cube with 6 different sides. On the edges there are smudged stitches, letters, cards, and Velcro. Made from plastic and covered with “Fleece” fabric.
The flat images are attached using Velcro and pins, in which various washable materials
(pictures) can be placed.
Victimization
of the supporter in activities: frontal, subgroup, individual, independent games.
Steps
Method 1 of 2:
Making a simple cube
- 1
Take a piece of paper.
The larger the sheet, the larger the cube it will turn out to be.
- 2
Draw the body of the cube.
Draw a long rectangle in the center of a piece of paper and divide it into 4 squares with a side of 5 centimeters.
- 3
Draw the right side.
Draw another square to the right of the second square from the top.
- 4
Draw the left side.
Draw another square to the left of the second square from the top.
- Now the drawing should look like a cross, consisting of six identical squares and located with the long part towards you.
If you have a printer, you can print the design to use as a template. Remember that the “ears” or indents on the sides and top of the cube will be needed if you are going to glue the cube together.
- 5
Cut out the design.
Using scissors or a utility knife, cut along the outer lines of the shape. If you have printed the template and will be gluing the cube, be careful not to cut off the margins!
- 6
Fold the paper.
Fold the paper inward along the inner lines.
- 7
Match the folds.
The lowest square must be bent so that it lies parallel to or directly opposite the square in the middle.
- 8
Finish the cube.
Secure all sides together with adhesive tape (eg tape) and you're done!
- 9
Ready!
Method 2 of 2:
Origami cube
- 1
Take a square piece of paper and fold it.
Fold in half, then unfold. Fold diagonally and unfold. Fold along the other diagonal and unfold again.
- 2
Form a tent.
Grab the edges of the half folds and press them together so that the diagonal folds are on the edge and the paper becomes triangular. Press it down until it becomes flat.
- 3
Fold the corners.
With the open side of the paper facing you, take one of the four bottom corners and fold it up to the top edge.
- 4
After this, take the tip of the resulting small triangle and bend it towards the center line.
- 5
Tuck in the triangles.
Take the corner you folded toward the top and fold it down to tuck it into the pocket that forms the smaller triangle. Hold it down.
- 6
Repeat on the other side.
You should get a mirror image.
- 7
Continue until all four corners look the same.
You will need to flip the piece over to make two of them.
- 8
Fold the bottom and top together.
Fold the bottom and top down toward the center on one side and up toward the center on the other side.
- 9
Open the sides.
Open the paper shape to make an X.
- 10
Blow into the hole to open the cube.
Blow hard into the hole to inflate the figure as you would a balloon. This will make a cube. Pinch, fold into the desired shape and have fun!
Adviсe
- If you want, you can draw dots on the sides of the die to create a dice!
- Make lots of small paper cubes of different colors and place them on the lights on the garland to make a holiday decoration. BUT never leave them unattended!
- Paper
- Markers or colored pencils
- Scissors or utility knife
- Duct tape (like duct tape)
- Ruler
- Printer (optional)
Non-traditional speech therapy manual "Logocube"
Irina Nubaryan
Non-traditional speech therapy manual "Logocube"
Non-traditional speech therapy manual "LOGOCUBE"
This speech therapy manual can be used by speech therapists and teachers in individual lessons and in children’s independent games.
The manual consists of a cube with 6 sides of different colors and flat images of objects, animals, plants, etc. The images are removable, they are attached to the cube using Velcro. The child’s task is to attach pictures to the faces of the cube in accordance with the assignment.
The manual can be used for classes with children 4 – 7 years old.
Main advantages of the manual:
• cubes are easy to use;
• one child or several children can participate in the game and complete tasks at the same time;
• cubes can be rearranged and moved;
• they are voluminous, but convenient for storage;
• planar images of objects (pictures) can be stored directly inside the cube;
• cubes give the speech therapist and educator the opportunity to use a variety of didactic games in their work aimed at developing children's vocabulary, grammatical structure of speech, phonemic analysis, phonemic representations, developing cognitive processes, spatial orientation, as well as automating sounds.
Didactic games and formation tasks
lexical and grammatical structure of speech.
Game “SAY IT IN ONE WORD”.
— consolidation of general concepts in children’s speech.
The speech therapist shows the children each face of the cube with object pictures attached to them. The children's task is to name the pictures depicted on one side of the cube with one general word.
Game “MATCH BY COLOR”
— consolidation of ideas about color and the use of quality adjectives in children’s speech.
The speech therapist invites children to attach to each face of the cube pictures depicting objects, plants, of the same color as the face.
Game “MATCH BY SHAPE”
— consolidation of children’s ideas about geometric shapes.
The speech therapist suggests that children attach round objects to one side and square ones to the other.
Game "GAMES - RIDDLES"
- expanding the vocabulary with adjectives.
The speech therapist makes a guess about some animal, listing its signs.
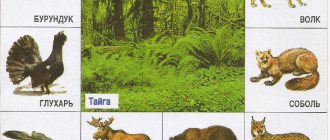
For example: brown, shaggy, clumsy; cunning, fluffy, red, etc. The child must find on the table a picture of an animal that meets this characteristic. If the choice is correct, the child attaches the picture to the cube.
The conditions of the game may change: the speech therapist selects a picture, and the child gives a description of the animal or object depicted on it. If the characteristic is correct, the picture is attached to the face of the cube.
The game “WHAT’S MISSING?”
- exercise children in the formation of nouns in the accusative case of the singular;
The speech therapist puts in front of the children a cube with object pictures attached to its faces, asks them to look at the pictures and remember them. After this, he asks the children to close their eyes, and he removes one of the pictures. Children open their eyes and answer the speech therapist’s question, “What (who) is missing?” Answers must be complete: “The hat is gone,” etc.
Didactic games and formation tasks
Game "MAKING PROPOSALS"
- development of coherent speech and logical thinking.
The speech therapist attaches object pictures to the logocube with images of objects that are not related to each other in meaning (car, album, dog). You need to make as many sentences as possible with these words. You can change cases and use other words.
For example: “The dog was carrying an album to the car. Sasha was sitting in the car and drawing a dog."
Game “WHERE IS WHAT IS”
- development of spatial concepts in children;
- intensifying the use of prepositions in speech to indicate the spatial position of objects.
The speech therapist distributes sheets of cardboard and sets of objects cut out along the contour to the children. One child is asked to complete a task on a log cube. It is desirable that this is a child with a good level of development of spatial concepts. He completes the task on the logocube in such a way that the other children cannot see its working surface. The speech therapist gives the following tasks: “In the upper right corner there is an apple, to the left of the apple there is a ball. Under the ball is a doll, etc.”
After the children finish their work, the speech therapist turns the working face of the cube towards the children, and the children compare their pictures with the logocube.
Author's didactic manual "Miracle - Tree" I bring to your attention the author's didactic manual "Miracle - Tree" The purpose of this manual is the development of fine motor skills, formation.
Presentation “Road ABC” Hello, I would like to offer you the multimedia guide “Road ABC” for viewing. Designed for young children though.
Make a photo cube with your own hands
Small anti-stress cubes are now available for sale.
A cube assembled in a special way can be rotated endlessly. But if you make it larger and stick photographs on it, you get a double effect, a real anti-stress. It especially delights children. Flipping through the photographs on the cube, it evokes warm feelings in adults. Before writing this article, just in case, I scoured the Internet in search of other options for assembling and sticking photographs. For various reasons, the order in which I viewed the photos did not quite work for me. And the way I want to share with you seems to me to be the most interesting. It loops and constantly returns to the first photo, holds 10 photos and is fairly easy to assemble.
First, you can watch the video to make it more clear, and then I will describe step by step the entire algorithm for assembling the cube.
Card index of didactic games for the non-traditional manual “LOGOCUBE” card index for speech development
The manual can be used for classes with children 4 – 7 years old.
Download:
| The attachment | Size |
| kartoteka_igr_dlya_logokuba.docx | 19.12 KB |
Preview:
Municipal budgetary preschool educational institution
"Elitovsky kindergarten "Kolosok"
CARD INDEX OF DIDACTIC GAMES
for non-traditional benefits
Burina Svetlana Valerievna
Non-traditional speech therapy manual "Logocube"
The manual can be used for classes with children 4 – 7 years old.
Main advantages of the manual:
• cubes are easy to use;
• one child or several children can participate in the game and complete tasks at the same time;
• cubes can be rearranged and moved;
• they are voluminous, but convenient for storage;
• planar images of objects (pictures) can be stored directly inside the cube;
• cubes give the speech therapist and educator the opportunity to use a variety of didactic games in their work aimed at developing children's vocabulary, grammatical structure of speech, phonemic analysis, phonemic representations, developing cognitive processes, spatial orientation, as well as automating sounds.
Didactic games for the development of sound culture of speech and phonemic hearing
Game “GYMNASTICS FOR THE TONGUE”
Goal: development of articulatory motor skills.
Description of the game. The pictures that are inserted into the pockets show signal drawings for articulation exercises: painter, horse, mushroom, cup, horse, etc. Small rhymes are selected for each exercise. The teacher reads a poem, the child finds this exercise and completes it.
Game "FIND THE PICTURE"
Goal: differentiation of sounds in words.
Description of the game. The teacher lays out pictures whose names contain sounds that are close articulatory and acoustically (the same number of pictures are selected for each sound) with the pattern facing up. Then he instructs a child or a subgroup of children to find pictures with only one sound and attach one picture to each face of the speech cube. When all the pockets of the logocube are filled, the children check the pictures to make sure there is no conflicting sound. This game can be played to differentiate hard-soft, voiced-dull sounds.
Game "SOUND TRACK"
Goal: automation of isolated sound.
Description of the game. The edges show pictures with sound tracks for a specific sound: an airplane with a remaining trace, a pump with a hose, a kettle with steam, a snake on a path, etc. The child finds an image for a given sound and pronounces the sound in one exhalation, running his finger along the sound track.
Game “IDENTIFY THE FIRST SOUND IN THE WORD”
Goal: exercise children in identifying the first sound in a word.
Description of the game. The teacher hands out cards to the children, asks which of them has an object whose name begins with the sound /A/, etc. The one who correctly names the object attaches a picture to the side of the cube with the corresponding letter.
Game "FIND THE PICTURE"
Goal: differentiation of sounds /l/-/r/ in words.
Description of the game. The teacher lays out pictures with the sounds /l/ or /r/ in their names (the same number of pictures are selected for each sound) pattern up, then distributes the children into two groups and tells them that one group will select pictures with the sound /r/ in names, and the other with the sound /l/. At the teacher’s signal, one child from each group approaches the table. One of them takes a picture with the sound /p/, the other - with the sound /l/ and attaches them to the faces of the cube with the corresponding letters. At the end of the game, both teams check each other's pictures. This game can be played to differentiate whistling-hissing, voiced-voiceless.
Games with PURE SAYINGS
Goal: automation of sound in syllables and words, development of phonemic hearing, grammatical structure, and vocabulary.
Description of the game. Pictures with pure sayings are placed on the faces of the cube.
Option 1 . The child, turning the cube, pronounces pure sayings. You can speak pure phrases with different intonation, timbre, quietly - loudly, slowly - quickly.
Option 2. Finish the sentence cleanly. The teacher pronounces the beginning of the phrase, and the child looks for a picture with a suitable ending and completes the sentence.
Didactic games on formation
lexico-grammatical structure of speech.
Game “SAY IT IN ONE WORD”.
Goal: to consolidate general concepts in children’s speech.
Description of the game. The teacher shows the children each face of the cube with object pictures attached to them. The children's task is to name the pictures depicted on one side of the cube with one general word.
Game "DIVIDE THE WORD"
Goal: developing the ability to divide words into syllables.
Description of the game. The teacher attaches cards with stripes to the four faces of the cube: on the first - a card with one stripe, on the second - with two, on the third - with three and on the fourth with four stripes. The teacher explains to the children that on the edge with one stripe they need to attach pictures with objects whose names are not divided into parts (monosyllabic words); to the other side - a picture with objects whose names can be divided into two parts, etc.
Game “MATCH BY COLOR”
Goal: to consolidate ideas about color and the use of quality adjectives in children’s speech.
Description of the game. The teacher invites the children to attach to each face of the cube pictures depicting objects, plants, of the same color as the face.
Game “MATCH BY SHAPE”
Goal: to consolidate children’s ideas about geometric shapes.
Description of the game. The teacher invites the children to attach round objects to one side and square ones to the other.
Game "GAMES - RIDDLES"
Goal: expanding the vocabulary with adjectives.
Description of the game. The teacher makes a guess about some animal, listing its characteristics.
For example: brown, shaggy, clumsy; cunning, fluffy, red, etc. The child must find on the table a picture of an animal that meets this characteristic. If the choice is correct, the child attaches the picture to the cube.
The conditions of the game may change: the teacher chooses a picture, and the child gives a description of the animal or object depicted on it. If the characteristic is correct, the picture is attached to the face of the cube.
The game “WHAT’S MISSING?”
Purpose: to exercise children in the formation of nouns in the accusative case of the singular; development of attention.
Description of the game. The teacher puts in front of the children a cube with object pictures attached to its faces, asks them to look at the pictures and remember them. After this, he asks the children to close their eyes, and he removes one of the pictures. Children open their eyes and answer the teacher’s question “What (who) is missing?” Answers must be complete: “The hat is gone,” etc.
Didactic games on formation
Game “MAKE A PROPOSAL”
Goal: development of coherent speech, logical thinking.
Description of the game. The teacher attaches object pictures to the logocube with images of objects that are not related to each other in meaning (car, album, dog). You need to make as many sentences as possible with these words. You can change cases and use other words.
For example: “The dog was carrying an album to the car. Sasha was sitting in the car and drawing a dog."
Game “WHERE IS WHAT IS”
Goal: development of spatial concepts in children; intensifying the use of prepositions in speech to indicate the spatial position of objects.
Description of the game. The teacher gives the children sheets of cardboard and sets of objects cut out along the contour. One child is asked to complete a task on a log cube. He completes the task on the logocube in such a way that the other children cannot see its working surface. The teacher gives the following tasks: “In the upper right corner there is an apple, to the left of the apple there is a ball. Under the ball is a doll, etc.”
After the children finish their work, the teacher turns the working face of the cube towards the children, and the children compare their pictures with the logocube
How to make a cube out of paper: detailed creation instructions
Reading time: 5 minutes Don't have time?
The link to the article has been successfully sent!
We will send the material to you by e-mail
When you need a base in the form of a cube for a craft, you need to know how to make a cube out of paper. The HomeMyHome editors will be happy to tell you in what ways you can do this, and you will choose the option that you like best.
Soon you will have cool homemade paper cubes PHOTO: bestdiy.ru
Secrets of making a simple volumetric cube
When you suddenly need a cube in your house, there is nothing easier than making it out of paper. There are several assembly methods.
How to make a cube out of paper: development diagram
A development is a simple diagram that will allow you to assemble a three-dimensional product from a material. The cube development can be printed, glued or made yourself.
Manufacturing instructions
Let's decide what kind of cube we want to assemble from paper or cardboard, or maybe you want to make a cube with photographs with your own hands?
How to make a paper cube
How to make a paper cube according to the diagram? It is easy and simple to download and print. Then you can follow the simple instructions and get the desired result.
To create a scan, prepare your own paper, a simple pencil, a ruler and scissors. Since each side of the cube is square, we need to draw squares with perfectly even right angles.
You can print a paper cube template PHOTO: fs-center.ru
Any cube has 6 faces, so there should be exactly six of them in the diagram. First, we draw a central square of the desired width (remember that the possibilities of A4 are not limitless), and around it we draw 4 more squares with the same side length. We draw the last square on any element
In addition to the edges, allowances for gluing are required. We draw them from the side, drawing them to the three sidewalls. Each allowance should not be more than 1 cm. Do not forget that the corners of the allowances are cut at 45º.
It turns out to be a cube PHOTO: pinterest.com
You can take scissors and cut everything along the lines. We bend the edges of the future cube. All allowances are also carefully bent and coated with glue. Now all that remains is to glue all the parts and let the product dry.
How to make a cube out of cardboard
Let's figure out how to make a cube out of cardboard with your own hands.
The only difference in making a cube from paper and cardboard is that we first make a development from paper if the cardboard is very thick. This will help avoid mistakes and sloppiness. No one forbids applying markings directly to the reverse side of the cardboard.
Here's how to make a cube out of cardboard PHOTO: shkolala.ru
DIY photo cube: creative photo album
How to make a cube with photographs with your own hands? This is a creative puzzle that allows you to assemble different photos.
The diagram of a do-it-yourself cardboard cube is absolutely identical to the diagram of its paper counterpart and can be reproduced even by a child PHOTO: syl.ru
To make a funny photo album on a transforming cube, you need to glue a piece of a photograph or picture to each of its faces.
In the work they use glue, ready-made cubes assembled from cardboard (4 cm edges), and tape.
For the transformation to be successful, you need to glue the cubes together correctly PHOTO: livemaster.ru
It is better to print the photos so that they match in size. The image must be taken with dimensions of 8×8 cm². You can immediately make a line 1 pixel wide: it will be easy to cut after printing, and the line itself will be invisible.
If we take 8 cubes, then we need to prepare 10 photographs. The picture is cut into 4 parts along the selected line, and each element is glued to the edge. But before that, you first need to stick strips of double-sided tape in a certain way.
Photos should be pasted as carefully as possible PHOTO: babyblog.ru
How to make an original and bright modular paper cube with your own hands
Creativity knows no boundaries, and paper is a source of inspiration for different people. Let's see how to make a cube from sheets of A4 paper.
Origami cube made from square paper
It is unlikely that anyone is not familiar with the word origami: the ancient technique continues to enjoy constant popularity among people of different ages.
It is very interesting to try to make a cube from origami paper.
For creative work you need a square from a sheet of A4 paper. The square must be folded twice diagonally, marking the fold lines. You need to make a triangle by tucking the edges inward. We bend the free corners to the top. Such actions must be done on all sides of the triangular figure.
Origami assembly diagram PHOTO: samodelki.org
You need to bend the opposite corners from the sides into the center, focusing on the vertical. We perform similar actions with the other side.
Where the conical protrusion remains, you need to bend the free corners twice, then putting them in the pockets.
All that remains is to find an open corner and blow air into the figure, obtaining a three-dimensional square. Now you know how to make it out of paper.
How to make a square from a rectangle
To make a square from a rectangular sheet, you need to grab any free corner and pull it to the opposite side of the sheet: the point is that the extreme sides completely coincide with each other. The lower part will remain free; you just need to cut it off.
How to make an origami paper cube
Here is a diagram of how to make a paper cube.
PHOTO: slovami.net
How to make a Rubik's cube from paper
Perhaps it is better to make such a bright cube together with children!
These are the stages of work to be performed:
IllustrationDescription of action
| Take a square and fold it in half |
| Unfold the sheet and fold one side towards the middle. Ironing the fold |
| Unfold the fold and fold the other side |
| Bend the first corner. We do the same with the opposite |
| You need to bend the edge of the “door” with a bent corner |
| We grab part of the “door” and bend the product at a slight angle |
| Now to the resulting figure we bend the second side with a bent corner, also in the form of a “door” |
| You need to bend the opposite corner, getting a parallelogram |
| The corner of the parallelogram needs to be hidden in a pocket |
| We bend the element with the corners facing each other outwards |
| Hiding the corner of one element in the pocket of another |
| We put all the elements into each other's pockets, forming a cube reminiscent of a Rubik's product |
| The result is beautiful and impressive |
How to make a dice out of paper
To assemble the dice, you need to print out a cube template for gluing.
We use thick cardboard onto which we transfer the template PHOTO: russiachess.ru
Yoshimoto Cube
A very interesting puzzle craft that you can reproduce at home with your own hands.
Sweep circuit
A cube that can be rotated and turned into different shapes is always popular. To make a craft, you need to take cardboard, a pencil, a ruler, scissors and PVA glue.
We print the template so that there are 16 elements PHOTO: multidea.ru
Yoshimoto scheme PHOTO: toysew.ru
Manufacturing instructions: video
The workpiece must be folded along the lines and glued with tape. This is done with each of the 16 parts. All elements must be connected to each other, and how to do this is in the video presented:
Now you know how to make a three-dimensional square out of paper. Good luck with your work!
Loading…
Speech therapy benefits
Speech therapy benefits. – K.: SKOSHI 2012. –
The brochure contains speech therapy aids. The equipment necessary for conducting any speech therapy game can be used variably, since all games are proposed for multi-purpose use in the process of correctional education and the development of correct speech in schoolchildren.
The collection is addressed to speech therapists and educators.
Innovative approaches to teaching and raising children with speech disorders have become widespread in my speech therapy practice. This brochure presents speech therapy aids: “Logocube”, “Tree of Related Words”, “Speech Therapy Constructor”, which I actively use in my work.
The equipment necessary for conducting any speech therapy game can be used variably, since all games are proposed for multi-purpose use in the process of correctional education and the development of correct speech in preschoolers.
All these benefits make children more active, develop cognitive interest, and during the game all aspects of speech, mental processes, general and fine motor skills develop.
Manual “Tree of Related Words”
Target:
Formation of the lexical and grammatical structure of speech and vocabulary, development of logical thinking, automation of sounds.
Description of the manual:
This game guide is a schematically drawn tree, where from the “root” - the main word - related words “grow” on the branches, which are also used to automate sounds.
Envelopes with pictures and words are included in the manual.
An approximate set of pictures and words:
leaf, moon, father, house, star, fish, table, snow, dove, etc. (see Appendix 1).
Manual "Logocube"
Target:
Development of all aspects of speech, mental processes, general and fine motor skills of the hands.
Description of the manual:
This game guide is a series of cubes, on the sides of which there are symbols of didactic games or exercises. The manual is multifunctional and variable.
Goal: Teaching the ability to correctly use prepositions, highlight them in a sentence, and make sentences with them.
Description of the cube: Schemes of prepositions are depicted on the faces of the cube.
Children pass the cube along the chain, saying the rhyme:
One two three four five,
You will rotate the cube!
The child, on whom the counting ended, rotates the cube with his eyes closed and selects a face. Opening his eyes, he calls her. Children take turns or at will come up with sentences with this “little word” - a preposition. The teacher can set a topic, for example: a sentence about autumn, in which there will be a “little word” on.
CUBE “PRESCRIPTION VERBS”
Goal: Teaching the ability to distinguish by meaning verbs with a common root part and different prefixes; When composing phrases, select the prefix verb that is necessary in meaning, and select several nouns for the verb.
(over-, under-, in-, from-, with-, you-)
Equipment: cube, toys, object pictures.
Description of the cube: diagrams of prefixed verbs are depicted on the faces of the cube.
Exercise 1
(action with a toy car): perform an action, make a sentence with a prefix verb according to the pattern that appears on the edge of the cube.
Task 2
(action with a cube and an object picture): select the correct and precise action (verb) for the picture and show a diagram for this verb on the cube.
Task 3:
perform an action according to the diagram on the cube.
Task 4
(action with a cube and a plot picture): continue the sentence with the addition of a prefixed verb (according to the diagram), show the corresponding picture.
Task 5:
who will select more prefixed verbs according to the scheme.
Task 6:
make up a phrase from a prefixed verb and a pronoun.
Task 7:
choose a prefix for the verb using the diagram.
Task 8(
cube and pictures depicting the actions of objects and people): select a prefix verb (according to the diagram) to a noun with a preposition.
For example: To the house..., from the tree...
Task 9:
come up with a continuation of the fairy tale using prefixed verbs (according to the diagram).
Task 10:
find a diagram for the word - action, the opposite in meaning.
For example: enters - leaves, arrives - leaves.
Manual "Speech therapy designer"
Target:
Development of tactile sensations, improvement of sound pronunciation.
Description of the manual:
In a wooden box with sides 3 cm high, there are compartments containing a variety of materials: velvet paper, fluffy shreds, thick ribbed tape, plastic construction parts with an uneven surface, buckwheat, peas, pebbles, beans, a mirror, an upside-down plastic stopper , a strip of carpet, a piece of embossed wallpaper, linoleum, a strip of foot mat.
To develop tactile sensations, the child runs his fingers over different materials, memorizing them and talking about his feelings. Then he closes his eyes and repeats the movement, trying to identify the material by touch.
To improve sound pronunciation: children compare different sounds with the nature of the surface of the material: soft material - soft sounds, hard material - hard sounds. The speech therapist, together with the children, decides with what sound they associate this or that material.
For example, preschoolers tap buckwheat with their fingers, pronouncing soft consonants: D-D-D, then on peas, pronouncing hard consonants: D-D-D. They run their hand over the velvet paper - Sh-Sh-Sh, knock on the pebbles, pronouncing assertively: G-G-G. The mirror helps the child control himself: he looks into it, determining the correct pronunciation.
Dictionary of related words for the textbook “Tree of Related Words”:
Cube with a face
Children will really love the box, from which a funny face will look out. For this craft you need a sheet of double colored A4 paper, scissors, a white sheet of 20 by 20 cm.
- Fold the A4 sheet in half lengthwise;
- Cut the sheet into two parts along the fold;
- From the resulting rectangles, cut out two identical squares;
- Fold the square twice diagonally;
- Fold each corner towards the center;
- Fold the top and bottom edges towards the middle;
- Unfold the folds, leave only two corners of the diamond folded, folded towards the center;
- Bend the outer corners of these bends outward;
- Fold the bottom edge up to the center;
- Fold the top edge to the same line;
- Unbend the workpiece and unfold it;
- Make a diagonal in the bottom right square, bottom left and top two;
- Turn the workpiece over;
- Press down on the corners and assemble the box;
- Repeat for the second piece;
- Nest the boxes inside each other to form an opening box;
- Fold the white square twice diagonally;
- Turn over and fold in half;
- Make a water bomb;
Draw a funny face on one side of the white part and put it in a colored box.
This will give you a face peeking out of a colored box. You can draw a face and use ready-made stickers and plastic eyes with moving pupils.
What to fill with
Fill homemade cubes with materials you don’t need around the house. Look for some of the following in your closet or shop at the hardware store for the most inexpensive options. Select fillers as follows:
Iron - sonorous
Place nuts, thimbles, coins, metal plugs, and bells inside. Place 4 coins (nuts, corks) in small iron cubes, and 8 coins in large ones.
Wooden ones sound dull and noisy
Remains of cardboard, pieces of wood, plastic buttons and beads, cereals, matches, small construction elements, small pebbles, broken shells are suitable.
Golden ones can be sung, these are vowels
Take any material from the list for ringing cubes.
Iron-wood rustling, heavier than iron-wood
Fill them with two types of material. For example, nuts and paper.
White - silent
Fill it tightly with pieces of fabric so that the child feels the weight.
It is very important not to use the same filler for cubes of different types. Zaitsev's method is based on tactile sensations and auditory association. If the warehouses sound the same, then the training will go wrong. Put a lot of filler into the double and large components of a homemade set, and half as much into the small ones.
On a note! Zaitsev's method is effectively used in teaching Russian as a foreign language to adults. After 4–6 lessons, students read fluently and pronounce most words clearly.
Cube for gluing
Many people, even in childhood, made paper cubes during labor lessons and glued them together. Cubes of this format can even be used for games, since this is precisely the purpose for which they are usually created.
You can use a template printed from the Internet to make such a cube, or you can draw it all yourself.
Take a sheet of paper or cardboard so that the cube is dense. Now, using a pencil and a ruler, draw 4 identical squares on it in a row, close to each other, so that they have a common wall with the neighboring one.
Above and below the second square we draw one square each in the same way.
On the first one, on the left edge, draw an additional small edge with beveled edges. On those that are above and below the second cube we draw such ribs on all three free sides.
Now you need to carefully cut out the entire shape and follow the folding lines with the blunt end of the scissors.
We put everything together and coat the ribs with glue, after which we glue the entire cube. In the video on how to make a cube, you can view all the instructions in detail.
Origami cube
The finished model turns out to be slightly unusual in appearance and beautiful. For this version of the paper cube you need 6 squares of paper. They can all be either uniform or multi-colored. The creation scheme is as follows:
- First, you need to decide where the front side of the sheets will be and where the back side will be.
- Place the paper sheet with the back side up so that each corner faces one of the four cardinal directions.
- Make two folds: one vertically and the other horizontally, after which everything is returned as it was.
- Next, you need to make two more folds, each with an upper (lower) corner and the middle of the sheet.
- Along the lines formed after point 4, the corners should be folded, and then done as in the fourth point, only now making folds between the middle of the sheet and its edges.
- After this, you need to bend the side corners of the sheet inward. If everything is done correctly, the entire wrong side of the resulting figure will be in the middle.
- Fold in the bottom left and top right corners.
- The created figure is folded at the top and bottom, while the top layer of paper needs to be slightly raised. As a result, the top edge should be placed at the top of the folded corner.
- The same thing that is indicated in the eighth paragraph must be done with the lower edge and corner.
- Next, you should turn the figure over to the other side.
- Its sharp corners should be bent to the center.
- The first figure is ready. To create a cube you will need five more of these, so you will have to repeat steps 1-11 five more times.
- Further work is carried out with each part in turn. Place the first one on the reverse side and turn it 90 degrees clockwise.
- Between the layers of paper in the part there are something like pockets. This is where you need to insert the second part, and completely.
- Next, the third part is inserted into the pockets located on the opposite side of the first part.
- Then the module must be turned in the same direction and by the same number of degrees as in step 13, and then put it back side up.
- The fourth part is installed in the pockets between the second and third.
- After this, the corners of the second and third elements are inserted into the slots of the fourth.
- The resulting module must be rotated 90 degrees to the side and in the same way vertically.
- Reveal it.
- Insert the fifth part into the visible gaps, and do the same with the corners as in previous cases.
- The same should be done to secure the sixth element on the back of the craft.
- The last step: tuck the corners into the free gaps on all sides.
The result is a bright cube that just won’t fall apart!
Originally posted 2018-03-19 10:16:40.
Cube using origami technique
There are a huge number of ways to assemble figures using the origami technique. But for simplicity, you should study the simplest method, which requires the following steps:
1Prepare a mold - a standard square of paper. It is better not to use cardboard, since it is dense and it will be inconvenient to assemble a figure from it.
2Fold the square in half along one side and diagonally in each direction. Fold the sheet along the side and diagonally in opposite directions: along the side in one direction, along the diagonals in opposite directions. Make a triangle as shown in the picture.
Scheme for assembling a cube using origami technique
3 Separate one part of the triangle, place it in the middle and bend it - it turns out that the corner rises to the top of the triangular base. Do the same with the second side.
4Next, in the reduced triangles, the angles located in different directions are directed towards each other - they bend the top of the triangle in half.
5Then you need to bend the free vertex of the triangle into a smaller one. Continue folding so that the assembled top can fit between two layers of the preliminary triangular blank.
6 Place the future figure on the table and bend the remaining triangular tops inward. It turns out that two tops are bent - you just need to bend them and straighten them back. These actions only form the edges of the future cube. The edges of the future figure are made in a similar way, bending the vertices in the opposite direction and also straightening them.
7Next, straighten the base, sending the sides with bent triangles inward.
8 A hole has been formed at one vertex of the triangle, into which it is blown to straighten the workpiece to form a cube. .
The result is a standard cube with equal faces and equal sides. It can be used for decoration and other activities. It will be difficult to write something on it, but it is possible. Since the product turns out to be large, they are recommended to be used for games with small children - with toddlers and preschoolers.